Internet of Things
SMART DOOR ALARM
Internet of Things
Submitted by
Ananya Mishra
BFT/18/439
Priyanka Ghosh
BFT/18/869
Shivam Gupta
BFT/19/L5
SMART DOOR ALARM FOR RMG INDUSTRY USING IOT
As we know that the branded garments can be identified clearly by their fabric, trims and accessories used on it. The brands have high standards of quality of zippers, buttons and labels. The brand gives their trims and accessories to garment industry by counting them and recounting them by the number of garments made. All these trims and accessories are stored in secured area where there is no unauthorized access. But still sometimes the trims and accessories are stolen from the storage area due to negligence of security personnels. These trims and accessories are then sold out in black market and then are used on first copies and knock-offs of the original garments. The consumer gets fooled by these original trims and accessories used on fake ones and tends to buy them. But this is totally unethical and there is need of a solution to prevent the stealing of trims and accessories.

The Solution
To prevent this we have made a device with the help of IOT that alerts when someone enters the storage facility.
Smart WiFi Door Alarm with notifier via mail
This device is designed keeping in mind to prevent stealing of things from storage areas. This device uses ultrasonic waves to calculate the distance between the device and the door.
Materials required
Nodemcu ESP8266-12E
Ultrasonic sensor HC-SR04
Breadboard
Jumper cables
Soldering iron
Solder material
5v power supply (direct usb adaptor or powerbank)
Software required
Arduino IDE
BLYNK app
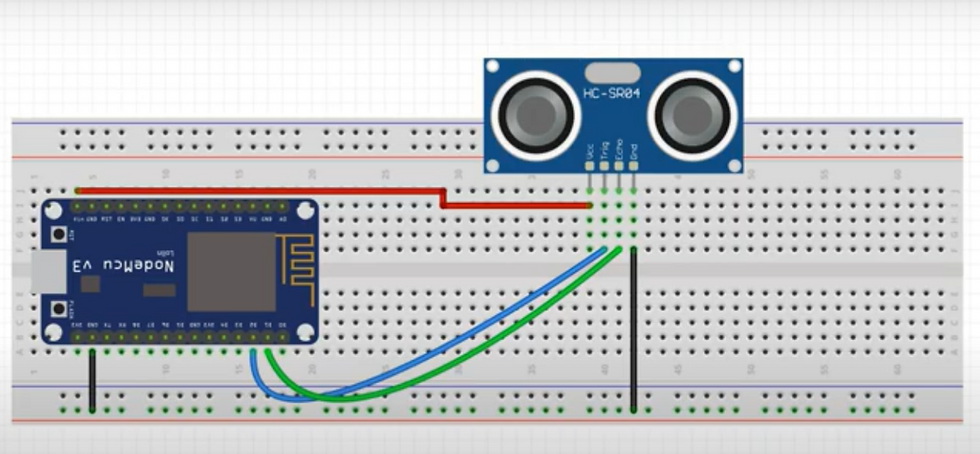
Schematic Diagram
Connect Gnd pin of ultrasonic sensor to Gnd pin of node-mcu using jumper cables.
Connect Vcc pin of ultrasonic sensor to V1n of node-mcu with cables
Connect echo pin of ultrasonic sensor to D1 of node-mcu.
Connect trigger pin of ultrasonic sensor to D2 of node-mcu.
Setting up of Arduino IDE
Download Arduino IDE from the link: https://www.arduino.cc/en/software
Copy the. json link with latest stable release of NodeMCU package from: https://github.com/esp8266/Arduino#installing-with-boards-manager.
The link should look something like thishttp://arduino.esp8266.com/stable/package_esp8266com_index.json
Paste the copied link and insert it in Arduino IDE using following sequenceFile -> Menu -> Preferences
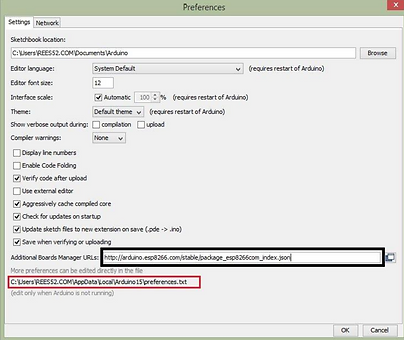
5. Paste copied link into the area shown in black box in given image. Close and restart the Arduino IDE.

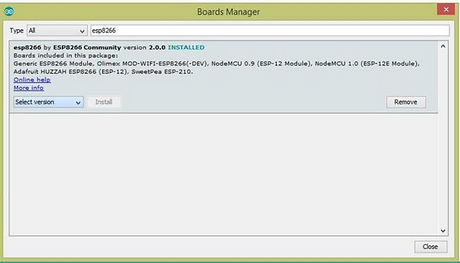
6. Tools - Boards Manager Tools -> Boards manager and search for ESP8266 and install the libraries/files given under heading ESP8266 by ESP community. Restart the Arduino IDE once again.
Here, we can see the location (Marked with red box) C: UsersREES52.COMAppDataLocalArduino15preferences.txt
Go to this location and delete all JSON Packages from Arduino15 folder. Now, Back to Board Manager and search for ESP8266 you will surely find.

7. Selecting NodeMCU Board in Arduino IDE
8. Add Blynk library just sames as ESP8266.
Process
After connecting the node mcu with ultrasonic sensor download bynk app and sign up.
Create new project and you will get the auth token on your email.
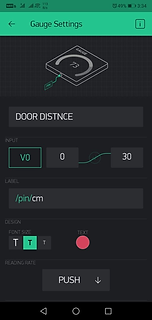
3. Click on add widget and add gauge and name it as door distance and set virtual pin to V0
4. Then set max range to 30.


5. Add notification widget and turn on the slider to notify when offline.
6. Add email widget.
Coding
Using the code mentioned below in Arduino IDE and replacing auth token with the one received on the mail and replacing wifi sssid and password with ours
#define BLYNK_PRINT Serial
#include <ESP8266WiFi.h>
#include <BlynkSimpleEsp8266.h>
#define trig D2
#define echo D1
long duration;
int distance;
// You should get Auth Token in the Blynk App.
char auth[] = "DY1JTYEC9yy0_qEhGvWjcCI8BU8KMImh";
// Your WiFi credentials.
// Set password to "" for open networks.
char ssid[] = "Honor 7X";
char pass[] = "shuvamgupta";
BlynkTimer timer;
void setup()
{
// Debug console
pinMode(trig, OUTPUT); // Sets the trigPin as an Output
pinMode(echo, INPUT); // Sets the echoPin as an Input
Serial.begin(9600);
Blynk.begin(auth, ssid, pass);
// Setup a function to be called every second
timer.setInterval(1000L, sendSensor);
}
void loop()
{
Blynk.run();
timer.run();
}
void sendSensor()
{
digitalWrite(trig, LOW); // Makes trigPin low
delayMicroseconds(2); // 2 micro second delay
digitalWrite(trig, HIGH); // tigPin high
delayMicroseconds(10); // trigPin high for 10 micro seconds
digitalWrite(trig, LOW); // trigPin low
duration = pulseIn(echo, HIGH); //Read echo pin, time in microseconds
distance = duration * 0.034 / 2; //Calculating actual/real distance
Serial.print("Distance = "); //Output distance on arduino serial monitor
Serial.println(distance);
if(distance <= 76)
{
Blynk.email("shivamrash1991@gmail.com",
"Alert!!", "DOOR OPENED");
Blynk.notify("ALERT! STORE DOOR OPENED");
}
Blynk.virtualWrite(V0, distance);
delay(1000); //Pause for 3 seconds and start measuring distance again
}
After using code connect the node mcu using micro usb cable and click on upload to verify and upload the code to node-mcu.
After successfully embedding the code the device will appear online on blynk app.
Now, test the device whether its running or not.
After successful test solder the board and sensor using iron and solder material and fix the device on back wall of the door.
Working
When the door is opened the door comes close to device and the device measures the distance and when door opens the sensor triggers the command and notifies on the mobile on which blynk is installed. Also, device informs the authorized person via email command.
The video of the working is below.
